
Shibuya Sorcerer Grades Explained: What Each Grade Unlocks
What sorcerer grades mean in Shibuya [Beta]: the grade ladder from Grade 5 to Semi-Grade 1, and which grade each feature and armor recipe requires.
Quick answer
Sorcerer grades are your sorcerer's rank in Shibuya [Beta]. You climb from Grade 5 through Grade 4, Grade 3, Semi-Grade 2, Grade 2 and Semi-Grade 1, and Grade 1 and Special Grade gate the top armor crafts, and your grade gates your build: Grade 2 is the main requirement to unlock a Cursed Technique, while craftable armor comes in Grade 4, Grade 2, Grade 1 and Special Grade tiers.
- Grade 2 unlocks the Cursed Technique Trial with Yuki Sato, Grade 2 armor recipes, and the Death Painting Blue Demon Variant's Demon Shift.
- Armor recipes unlock at Grade 4 (600–900 Yen), Grade 2 (2.5K–3.2K Yen), Grade 1 (6K Yen) and Special Grade (15K–20K Yen).
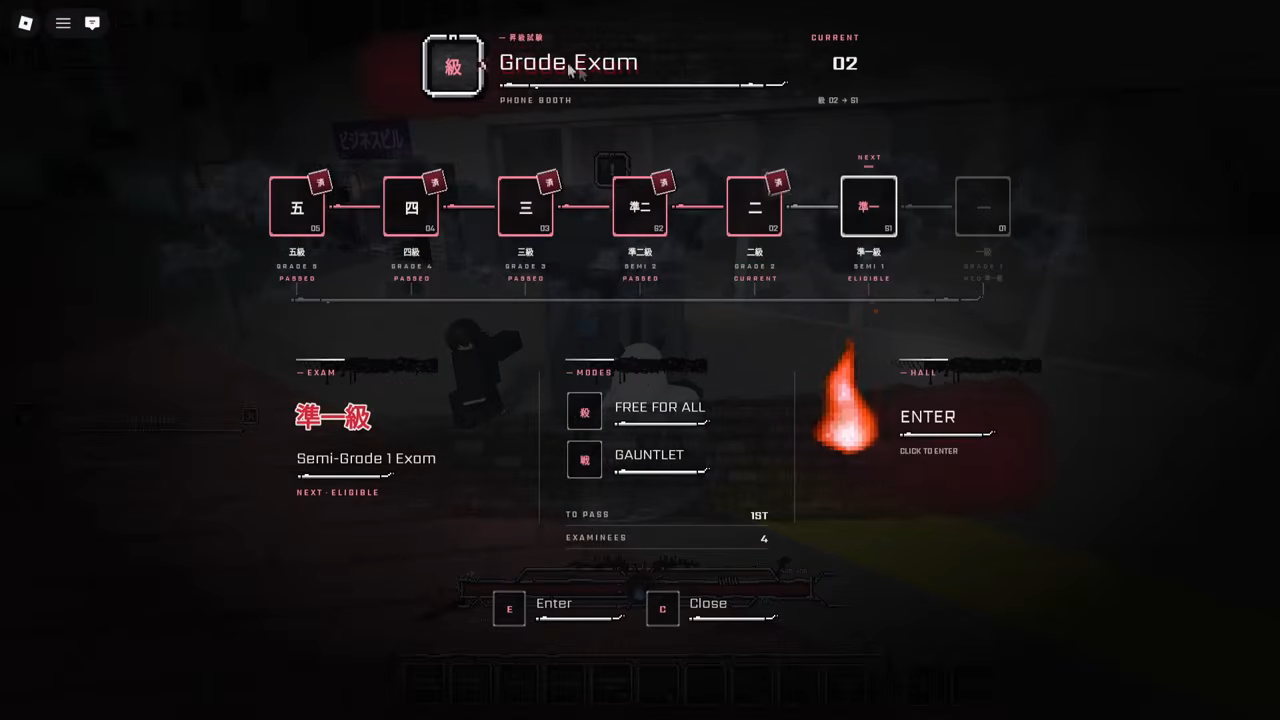
- The red phone booth's Grade Exam panel shows your current grade and your next eligible exam.
Grades are Shibuya [Beta]'s rank system for sorcerers, and they are worth understanding early because they stand in front of two of your most important unlocks: your Cursed Technique and your craftable armor. This guide covers what the ladder looks like, which grade each feature and crafting recipe requires, and where the game checks your rank.

The Grade Exam phone booth: where the game checks your rank
The red phone booth opens the Grade Exam panel, the screen where Shibuya [Beta] tracks your sorcerer grade. It displays the grade ladder as a set of rungs: Grade 5 (五, 05), Grade 4 (四, 04), Grade 3 (三, 03), Semi-Grade 2 (準二, 02), Grade 2 (二) and Semi-Grade 1 (準一, 01).
The panel also anchors that ladder to where you personally stand. Your current grade is marked CURRENT — a player at Semi-Grade 2, for example, sees CURRENT 02 — and the next exam you can take is flagged NEXT ELIGIBLE: for a Semi-Grade 2 player, that was the Semi-Grade 1 Exam, listed with details such as TO PASS 1ST and EXAMINEES 4. Exams come in two modes, FREE FOR ALL and GAUNTLET, and you press [E] to enter the panel from the booth and [C] to close it again.
How you climb the grade ladder
You progress through the sorcerer grades by containing curses and surviving Tube Simulations, and advancement is checked through the Grade Exam system. Shibuya's containment system lets you capture curses rather than only defeating them, while Tube Simulations are virtual fights that test your fighting skills and move your grade along.
For the full rank-up procedure, see the Shibuya progression guide. We also have a dedicated Tube Simulations guide and a curse containment guide covering both halves of the climb.
Grade 2: the gate to your Cursed Technique
Grade 2 is the number to watch, because the main requirement to unlock a Cursed Technique is reaching it. Once you are Grade 2 or higher, the Trial with Yuki Sato is how you attain your technique — tell her "Teach me my technique." to begin. Yuki also sells technique skills from an on-screen list; the list shown in gameplay was Blood Manipulation techniques, with Piercing Blood at ¥25,000, Slicing Exorcism at ¥12,000 and Supernovo at ¥40,000. Our how to get cursed techniques guide covers the Trial step by step, and the cursed techniques overview compares the techniques themselves.
Grade 2 opens two other things worth planning around:
- Grade 2 armor recipes — the 2.5K–3.2K Yen armor tier detailed below.
- Demon Shift for the Death Painting Blue Demon Variant — if you play that race variant, the ability lands at Grade 2. The races page breaks down every race and variant.
Armor crafting: grade and Yen requirements by tier
Craftable armor comes in four tiers — Grade 4, Grade 2, Grade 1 and Special Grade — and every recipe pairs its Yen cost with the grade it requires:
Armor crafting requirements by grade
| Armor tier | Grade required | Yen per recipe | Extra requirements |
|---|---|---|---|
| Grade 4 armor | Grade 4 | 600–900 | The first craftable tier; recipes use materials such as Mummy Wraps, Mushroom Caps, Fly Wings and Drone Wings. |
| Grade 2 armor | Grade 2 | 2.5K–3.2K | Technique-specific pieces can also require the matching technique user — the quoted Grade 2 recipe requires a Flame user. |
| Grade 1 armor | Grade 1 | 6K | - |
| Special Grade armor | Special Grade | 15K–20K | Technique-specific pieces require the matching technique user — the quoted recipe requires a Limitless user. |
Materials sit on top of the unlock cost: Grade 2 recipes consume drops such as Brute Teeth, Stitched Hide, Sand Cores, Summoner Cores, Spore Sacs, Mummy Wraps, Cursed Rounds, Drone Wings and Fly Wings. The crafting materials guide explains where to gather them, the full recipe list lives on the Shibuya armor page, and the Yen guide covers funding the crafts, since costs climb from a few hundred Yen at Grade 4 to 20K at Special Grade.
If you're still early in Shibuya [Beta], Grade 2 is the milestone to aim for: it opens the Cursed Technique Trial, its own armor tier and, for Blue Demon Variant Death Paintings, Demon Shift. From there, Grade 1 and Special Grade gate the top armor crafts. The beginner guide covers the systems leading up to that climb.
Related Guides
Progression Guide: Grades & Rank-Ups
Advance sorcerer grade by grade: rank-up missions, Grade Exams, gate costs and why Grade 2 matters.
How to Get Cursed Techniques
Get your first cursed technique: reach Grade 2 at the red phone booth and clear the Yuki Sato trial route.
Armor: Every Piece, Recipe & Stat
Look up any of the 28 craftable armor pieces by tier with recipes, costs, stats and talents.
How to Get Yen & What It Buys
Earn Yen through documented activities and see what each unlock costs, from ¥600 to ¥60,000.